
My first stop was Pinterest to see what other people were liking and if there was anything that I could forge with supplies to hand.
Prima's Lyrique flowers looked like they might be do-able so I searched for other people's tutorials for 5-pointed felt flowers. {I'm lazy and there's no point in re-inventing the wheel OK?!} Unfortunately I couldn't find anything that matched, so I grabbed some felt scraps and got playing.
My first attempt was nearly there but not quite (even if had added the central pearl). My second attempt was better and I'm sure that further work could get even closer to the original, but I'm happy to leave that to the rest of you.
So here goes:
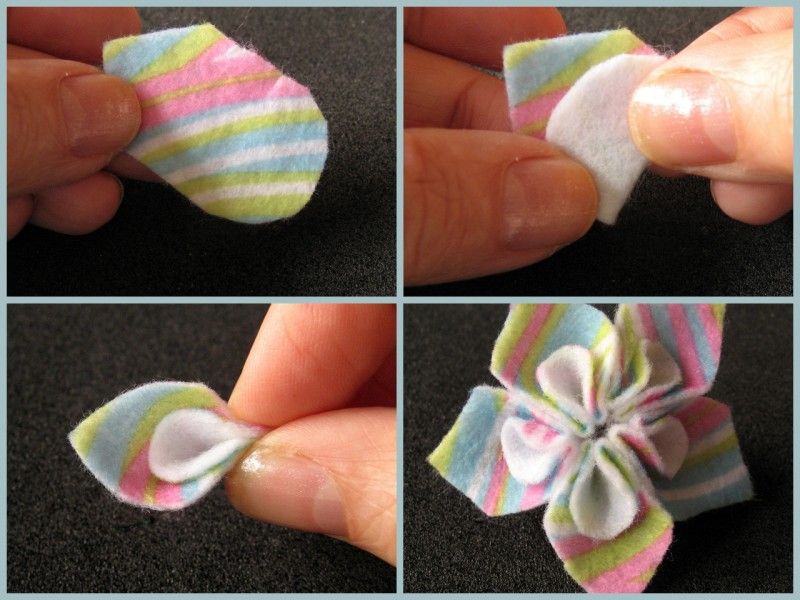
You need 5 pieces of felt, one for each petal - mine are cut from 1" x 1¾" rectangles (2.5cm x 4.5cm) and form a flower 2¼"-2½" across (5.5cm-6cm). Cut the one end of a felt rectangle into a point and cut the other end into a semi-circle. Fold the semi circular end over so that the curved edge meets the base of the triangle formed by the pointy end. {Can you now understand why I took photos - far easier to understand!}
So here goes:
You need 5 pieces of felt, one for each petal - mine are cut from 1" x 1¾" rectangles (2.5cm x 4.5cm) and form a flower 2¼"-2½" across (5.5cm-6cm). Cut the one end of a felt rectangle into a point and cut the other end into a semi-circle. Fold the semi circular end over so that the curved edge meets the base of the triangle formed by the pointy end. {Can you now understand why I took photos - far easier to understand!}

Pinch the folded end in half and secure with thread (or glue). Repeat for the remaining petals and stitch (or glue) them into a circle. Add some sort of decoration to the middle of the flower and you're done.
For my September Counterfeit Kit flowers I wasn't sure what colour I wanted in the centre so I simply popped in some brads which I can swap around later if required.

Do let me know how you get on if you try making some yourself.
These are pretty cute - and I really the colours you've chosen to work with!
ReplyDeleteYou did a great job recreating those!
ReplyDeleteRinda
I really like the idea of putting the brad in the middle for added colour coordination ease
ReplyDeleteThese look amazing, love them :)
ReplyDeleteThese are a lot easier than they look - you are smart!
ReplyDeleteOh, oh, oh, LOVE these!! I shall definitely give them a go :) May I please share them with my group of mums that meets once a month? I think they'd love to try them, too :)
ReplyDeleteI'm all for easily changeable middles! Wondering if I managed to purge all my felt scraps. Bet I could do this with ribbons or similar though... hmmm
ReplyDeleteI made one! Not especially difficult, even for uncoordinated, left-handed, me. And I am happy to report, it is already gracing a layout.
ReplyDeleteThese are cute! Thanks for the instructions on how you made them.
ReplyDeleteThese are adorable and look so much easier to make than I thought they'd be. I just might have to give them a go!
ReplyDeleteThese are adorable and look so much easier to make than I thought they'd be. I just might have to give them a go!
ReplyDeleteawesome flowers - thank you.
ReplyDeleteLove those!!! Doesn't look too hard to create and the end result is fantastic!
ReplyDeleteReally great! You made it look easy. :)
ReplyDeleteOh super cute.
ReplyDeleteI love your flowers-and I want some for a headband or sweater!Pinning for later!
ReplyDeleteI so want to make some of these!!!!! xoxo
ReplyDeleteThank you so much for this clear tutorial. I've pinned it and will use it!
ReplyDeleteGreat tutorial Jemma...I would have missed it but for Mel's post today!!
ReplyDeleteAlison xx